Microfrontend with Angular and Webpack Module Federation
Large software monolithes have been a common problem in business applications for years. Backend architects already came up with microservices to tackle this problem a while ago. But frontend developers were still lacking a clean technical solution until now. Most of today’s microfrontend solutions (such as webcomponents) feel cumbersome and overcomplicated. Especially if you want to use a framework like Angular, React or vue.js.
Furtunately, Angular 11 (or rather Webpack 5) finally comes up with a solution for this: The Webpack ModuleFederationPlugin. This awesome chunk of code allows applications to load and evaluate JavaScript modules at runtime. It enables you to develop all parts of your application individually (e.g. in different teams) while still bringing it together in a single, modern single-page-application/SPA.
But like every game changer, Module Federation comes along with some side-effects which might prevent you from using it for now. Therefore let’s first have a look whether this technology suits your needs.
When should I use Module Federation?
Module Federation is not the only solution for Microfrontend architectures. In fact, you might find a better fit for your specific project in an alternative integration pattern (like webcomponents or even iFrame integration). That is why you should consider the pros and cons carefully. This kind of architecture decisions will usually affect your project in a large and long-term scope.
To be more specific, Module Federation can be of great use when:
- You have a large project that tends to end up as a software monolithe in traditional architectures
- You can split your project into several, more of less self-sufficient domains (e.g. in Self-Contained-System/SCS architecture)
- The application will be developed in multiple and independent teams
- Your teams can agree on a frontend framework (like Angular) for the purpose of harmonization
- You do not plan to give up this harmonization in the near future
When should I not use Module Federation?
At the same time, there might be some show stoppers that will prevent you from using Module Federation or at least make it significantly less useful for you. That is when you should probably fall back on another solution for your Microfrontend architecture.
Consequently, you might want to consider an alternative solution when:
- Your application will not become very extensive in near future
- Your teams want to develop with different frameworks and major versions (you will lose a lot of Module Federation’s benefits here)
- You do not have control over the framework and version usage of the individual teams
- One or more of your microfrontends might want to swap to a different framework in near future
- You do not use webpack as a module bundler (Module Federation is a webpack 5 feature)
- You require an old Angular version < 11.0.0 (Angular 11 first has opt-in support for Webpack 5)
I strongly recommend to stick with a different integration pattern in your Microfrontend architecture if one or more of the points above apply to your project.
What does a Microfrontend app that uses Module Federation look like?
Without going into implementation details too much, an application that has been developed using Module Federation will exactly feel like an ordinary single page application (SPA). Just think of it like a properly developed Angular application which is using lazy-loading and dynamic component generation (e.g. when creating a customizable dashboard). The only difference is that the lazy-loaded module are not hosted on the same server as the main application, but loaded from a so-called remote host.

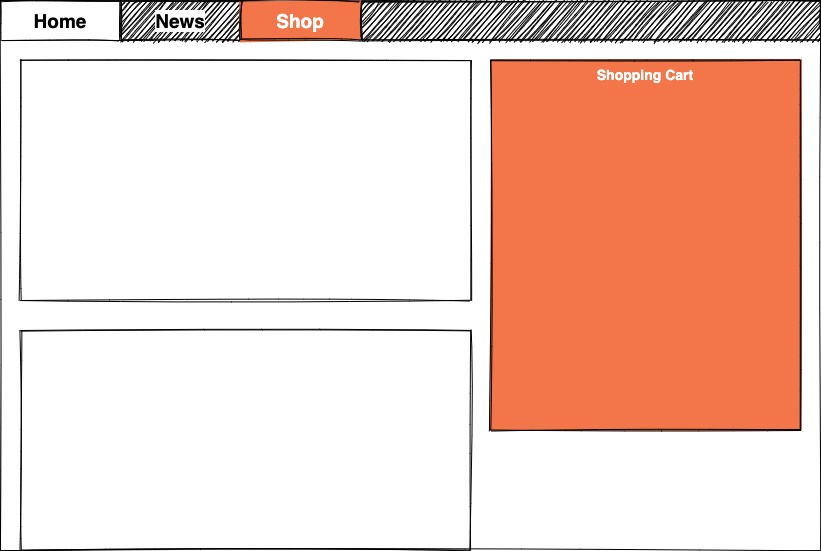
The picture above show two different use cases where Module Federation brings advantages.
The easier and more staightforward use case is when integrating remote modules directly into the Angular router (symbolized with the Shop link in the image). Your main application (or shell) just needs to define a new route like “/shop” for the remote module and instead of lazy loading a local module, a remote module will be imported. Your application will load the required sources on demand when the user clicks on the router link and the view component defined by the module will be rendered in your application.
What requires a little more setup and effort is rendering single components anywhere within your application without using the router. This comes in handy when you want to render various components together in a single view (like a Dashboard with configurable widgets) or if you need this component anywhere in your application frame. Think of a shopping cart icon in the top menu for example. What makes it more complicated is the fact that rendering single components requires the shell application to have knowledge about the remote module’s components. The module must provide some interface to access the related component factory as it is unknown to the shell application.
How to build a Microfrontend application in Angular with Webpack Module Federation
Enough theory so far – let’s try to get the hands dirty. I will show you an exemplary Angular application that sets up the webpack ModuleFederationPlugin for both the shell and the remote application. The shell app will integrate a view of the remote app as well as display a single component from the remote in its application header bar.
You can find the simple demo application at my github repository in the simple module federation branch. I will provide other variants that show how to dynamically load and import modules at runtime. Those examples will also cover production-ready usage of the ModuleFederation feature.
For the start, we will use a simple application setup. We assume that the hostname of the remote application is static and known at compile time.
Getting started
Before you can use ModuleFederation, you need to incorporate a few minor changes to your Angular CLI project:
- Force resolution of webpack 5
- Add support for customizable webpack configuration
Installing webpack 5
You can start off with a simple Angular 11 CLI application. I will assume you have already done that before. The first thing that you will need to change is to opt-in Webpack 5 in your project setup. You can do this by adding the following lines to your project’s package.json file.
{
  "resolutions": {
    "webpack": "^5.0.0"
  }
}
This few lines of code tell your package manager to resolve webpack to version 5. Unfortunately, the resolutions key is not supported by npm by default. This is why I recommend to use yarn as the package manager for your projekt instead. The npm package npm-force-resolutions promises to add support for this feature, but I did not test it so far.
If you decide to use yarn, you will also need to tell the Angular CLI which package manager you are using. You can do so by adding the following code to your ´angular.json´ file:
{
  "cli": {
    "packageManager": "yarn"
  }
}
Exposing the webpack configuration
The next thing to do is adding support for a custom webpack configuration. Angular internally already uses webpack for bundling the application, but it does not expose the configuration file for the developer without some minor tweaks. Fortunately, the community has come up with a few helper packages here: Ngx-build-plus or @angular-builders/custom-webpack. I will be using @angular-builders/custom-webpack in my example, but you will probably achieve similar results with ngx-build-plus.
Install @angular-builders/custom-webpack by running the following command in your console. This will install the package and add it to your devDependencies.
yarn add package-name -D
// or
npm i -D @angular-builders/custom-webpack -D
Next, you need to tell Angular to use the custom builder instead of the default one. Edit your angular.json in the build and serve sections like shown in the example below.
{
  // ...
  "projects": {
    "": {
      // ...
      "architect": {
        "build": {
          "builder": "@angular-builders/custom-webpack:browser",
          "options": {
            "customWebpackConfig": {
              "path": "webpack.config.ts"
            }
            // ...
          },
        },
        "serve": {
          "builder": "@angular-builders/custom-webpack:dev-server"
          // ...
        },
      }
    }
  },
}
As you can see, I also added the path to the webpack configuration file in there. What is special about the configuration is that it will be merged with the default webpack configuration coming from Angular. This is why we only need to add the parts of the configuration that we require for Module Federation. You can find more information on how configurations are merged in the documentation of @angular-builders/custom-webpack. I will use a TypeScript file because I think it is easiest to manipulate.
Configuring the Shell Application
In the shell application, we need to configure the Webpack ModuleFederationPlugin in a way that Webpack knows what modules will be loaded at runtime. Normally, Webpack expects all modules to be available at compile time. Therefore we need to tell Webpack where those remote modules can be found later on. The webpack.config.ts for my demo shell app looks like this:
import { CustomWebpackBrowserSchema, TargetOptions } from '@angular-builders/custom-webpack';
import { Configuration, container } from 'webpack';


export default (config: Configuration, options: CustomWebpackBrowserSchema, targetOptions: TargetOptions) => {

  config.output.uniqueName = 'shell';
  config.optimization.runtimeChunk = false;

  config.plugins.push(
    new container.ModuleFederationPlugin({
      /* Map the remote module name (how they are imported here vs. how the remote module exposes them */
      remotes: {
        'mf1': 'mf1@http://localhost:4300/mf1.js'
      },

      /* "Shared" modules will not be included in remote module bundles. */
      shared: {
        '@angular/animations': {singleton: true, strictVersion: true},
        '@angular/core': {singleton: true, strictVersion: true},
        '@angular/common': {singleton: true, strictVersion: true},
        '@angular/forms': {singleton: true, strictVersion: true},
        '@angular/platform-browser': {singleton: true, strictVersion: true},
        '@angular/router': {singleton: true, strictVersion: true},
        rxjs: {singleton: true, strictVersion: true},
      }
    })
  );

  return config;
};
As stated before, we only manipulate the existing configuration inside the configuration file. Therefore you will only find the parts in here that are relevant for ModuleFederation.
In line 7, we manually define the uniqueName of the output configuration. Webpack uses the name from the package.json by default, but to prevent conflicts in monorepos I recommend to define it yourself. If you do not plan to organize your project in a monorepo and already use unique names in your package.json, you can skip this.
What you cannot skip at Angular v11.2.3 is setting the runtimeChunk optimization to false. This will cause the ModuleFederation solution to break, which is related to a bug currently.
In the plugins section, we add the new ModuleFederationPlugin to the plugins array of Webpack. In remotes, we add a map of remote module names that will be loaded from external. The key represents that name that will be used to import the module in the shell application. The value is a combionation the module scope mf1 and the remote file location which is http://localhost:4300/mf1.js in this example. You will see details on the pendant of the microfrontend’s configuration later.
Shared Dependencies between Shell and Remote Module
The shared section defines modules that are shared dependencies between the shell and the remote module. Defining the shared dependencies can greatly reduce the bundle size thus improving the user experience of your overall application. Nevertheless, Webpack needs to take care of version mismatches between your shell and remote apps. In the configuration as seen here, Webpack will emit errors at runtime when the shell and the remote require incompatible (major) versions of the shared modules (e.g. Angular v11 and Angular v12). You should try to prevent this kind of problem by harmonizing your development teams and synchronizing major version upgrades.
Webpack follows the semantic versioning specification automatically when resolving the shared dependencies. Make sure to give Webpack some freedom to choose in which version to use. For example, your application or module might perfectly work with different minor of even major versions of a specific library. In this case you can make use of the ^ operator or even >= to define a range of versions your app is working with. Webpack will try to resolve version conflicts and only load what is necessary. Misconfiguration might cause you to end up with multiple versions of a single library that are used simultanously.
Configuring the Remote Module/Application
The remote module’s Webpack configuration is changed in a similar way:
import { CustomWebpackBrowserSchema, TargetOptions } from '@angular-builders/custom-webpack';
import { Configuration, container } from 'webpack';
import * as path from 'path';

export default (config: Configuration, options: CustomWebpackBrowserSchema, targetOptions: TargetOptions) => {

  config.output.uniqueName = 'contact';
  config.optimization.runtimeChunk = false;

  config.plugins.push(
    new container.ModuleFederationPlugin({
      filename: "mf1.js",
      name: "mf1",
      exposes: {
        './Contact': path.resolve(__dirname, './src/app/contact/contact.module.ts'),
        './Clock': path.resolve(__dirname, './src/app/clock/index.ts'),
      },
      shared: {
        '@angular/animations': {singleton: true, strictVersion: true},
        '@angular/core': {singleton: true, strictVersion: true},
        '@angular/common': {singleton: true, strictVersion: true},
        '@angular/forms': {singleton: true, strictVersion: true},
        '@angular/platform-browser': {singleton: true, strictVersion: true},
        '@angular/router': {singleton: true, strictVersion: true},
        rxjs: {singleton: true, strictVersion: true},
      }
    })
  );

  return config;
};
The shared modules are configured as in the shell application. Since The demo uses and monorepo structure, the applications will have the same shared library versions anyways as they share the same node_modules folder.
The filename and name property define the JavaScript file’s name that will be generated by Webpack and the namespace the module container will take in the global window object. These values are exactly used by the shell application to load the file from the remote server in mf1@http://localhost:4300/mf1.js.
The exposes object defines what files (typically any TypeScript module) will be exported by mf1.js. In this case, I expose two modules:
./Contactis a module that exports an Angular NgModule with child routes./Clockis a module that exports an Angular component that should be rendered at runtime
Importing the remote module in the shell application
After your configuration is finished, you can already use the remote module in your shell application. We shall start with the easiest way of integration: Using remote modules in the Angular Router.
Using ModuleFederation in Angular Routing
Remote modules can be treated in a similar way like lazy-loaded modules in the same application. The only difference is that Webpack does not know that they will eventually be available at runtime. This is why our shell application needs to introduce those modules to the compiler first.
Create a new file remote-modules.d.ts next to your routing module in your shell application:
/* Tell the TypeScript Compiler that it should assume that these modules exist. They will be loaded and available at runtime. */
declare module 'mf1/Contact';
declare module 'mf1/Clock';
You could also add more information to the module declarations, but it is not absolutely necessary for it to work. Now you are able to import the mf1/Contact module into the route configuration exactly like you would to for a lazy-loaded module. You will need to know the name of the Angular NgModule class defined in mf1/Contact though, which is ContactModule in this case:
const routes: Routes = [
  {
    path: '',
    pathMatch: 'full',
    loadChildren: () => HomeModule
  }, {
    path: 'contact',
    loadChildren: () => import('mf1/Contact').then(m => m.ContactModule)
  }, {
    path: '**',
    redirectTo: '/'
  }
]
After starting the demo and navigating to the http://localhost:4200/contact route, you will notice that your browser just loaded the mf1.js file. Please do not be irritated by the file size. It is neither minified nor gzipped here. You will also see that the “Contact” page is displayed as if it would have been part of the shell application. Nice!

Creating single components of remote modules on the fly
A more complex example of using remote modules in Angular is creating components on the fly. In my example, I have created a directive and a service that help me take care of that.
The service looks like this:
@Injectable({
  providedIn: 'root'
})
export class RemoteModuleLoader {

  constructor(private _componentFactoryResolver: ComponentFactoryResolver) {}

  /**
   * Load a remote module. They cannot be imported with a variable like 'await import(variable)' due to webpack restrictions.
   *
   * @param name: The import name, separated by a slash (e.g. 'scope/module');
   */
  async loadRemoteModule(name: string) {
    const scope = name.split('/')[0];
    const moduleName = name.split('/')[1];

    /* This returns the ES6 module factory from the global window object. Webpack has already taken care of loading and initializing the
     module container. We just need to create a module instance by calling the factory.*/
    const moduleFactory = await window[scope].get('./' + moduleName);
    return moduleFactory()
  }

  /**
   * Get the factory for a given component by its type.
   *
   * @param component: The component type.
   */
  getComponentFactory(component: Type<unknown>): ComponentFactory<unknown> {
    return this._componentFactoryResolver.resolveComponentFactory(component);
  }
}
The structural directive:
@Directive({
  selector: '[remoteComponentRenderer]'
})
export class RemoteComponentRenderer implements OnInit {

  @Input()
  set remoteComponentRenderer(componentName: string) {
    this._componentName = componentName;
  }

  @Input()
  set remoteComponentRendererModule(moduleName: RemoteModule) {
    this._moduleName = moduleName;
  }

  private _componentName: string;
  private _moduleName: RemoteModule;

  constructor(
    private viewContainerRef: ViewContainerRef,
    private injector: Injector,
    private remoteModuleLoaderService: RemoteModuleLoader
  ) {}

  ngOnInit() {
    return this.renderComponent();
  }

  private async renderComponent() {
    try {
      const module = await this.remoteModuleLoaderService.loadRemoteModule(this._moduleName);
      const componentFactory = this.remoteModuleLoaderService.getComponentFactory(module[this._componentName]);
      this.viewContainerRef.createComponent(componentFactory, undefined, this.injector);
    } catch (e) {
      console.error(e);
    }
  }
}
As you can see, the directive has two input properties: The component name and the module name. Both of them need to be defined, otherwise the renderComponent() function will fail. The directive uses the loader service to a) get the remote module from the global window object and b) get the component factory.
Afterwards the sturctural directive dynamically creates a component instance within its own view container using the component factory. You can use the directive on a <ng-container> element to make the component appear without a wrapping container element. In a view, it would look like this:
<ng-container *remoteComponentRenderer="'ClockComponent'; module:'mf1/Clock'"></ng-container>
Summary
In this article I have shown a simple example how to use the new Webpack ModuleFederationPlugin to create a next generation Microfrontend architecture. You should keep in mind that you need to take further steps to make this example production ready though. I will write another post that brings you closer to production readiness with this technique.
In detail, I have provided examples how to:
- Setup
yarnas the package manager for your project - Customize the webpack configuration of your Angular build
- Use the new webpack ModuleFederationPlugin in both shell and microfrontend application
- Add lazy-loaded remote modules in Angular Routing
- Create components from remote modules anywhere in your application on the fly
Please feel free to contact me if you have any questions on this tecnique.


